A broken toilet handle or lever can be frustrating and inconvenient, but luckily it is a relatively easy fix that can be done quickly and inexpensively.
In this article, we will go through the steps to diagnose the problem, shut off the water supply, remove the old handle or lever, find a replacement, and install the new handle or lever.
How to Fix a Broken Toilet Handle or Lever
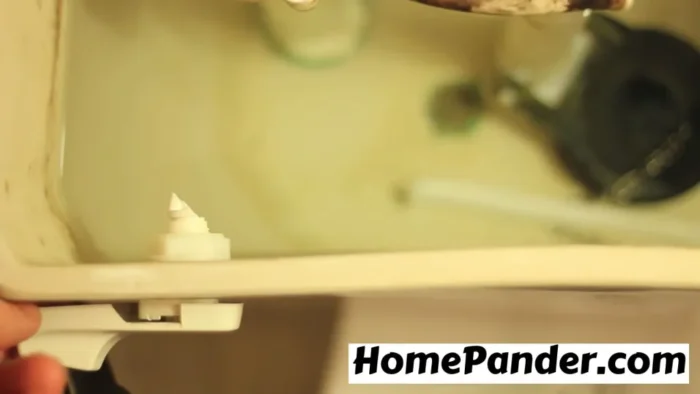
Diagnosing the problem
The first step to fixing a broken toilet handle or lever is to diagnose the problem. There are several reasons why your toilet handle or lever may not be working properly. The most common issues are:
- The handle or lever is loose or disconnected
- The chain or rod connecting the handle or lever to the flapper is broken or disconnected
- The flapper is not functioning properly
Shut off the water supply
Before you begin any work on your toilet, you should always shut off the water supply. The shut-off valve is usually located behind the toilet near the wall. Turn the valve clockwise to shut off the water supply.
Removing the old handle or lever
To remove the old handle or lever, you will need to locate the nut on the inside of the tank that secures it in place. Use a wrench to loosen the nut and remove the old handle or lever.
Finding a replacement handle or lever
Finding a replacement handle or lever is relatively easy. You can purchase a replacement at your local hardware store or online. Make sure to bring the old handle or lever with you to ensure you purchase the correct replacement.
Installing the new handle or lever
To install the new handle or lever, simply reverse the steps you took to remove the old one. Insert the new handle or lever into the hole in the tank and secure it in place with the nut. Make sure it is tight enough to prevent any movement.
Testing the new handle or lever
Once you have installed the new handle or lever, turn the water supply back on and test it out. Flush the toilet and ensure that the handle or lever is working properly. If it is still not functioning correctly, you may need to check the chain or rod connecting the handle or lever to the flapper or inspect the flapper itself.
Common problems and how to fix them
If your new handle or lever is still not functioning properly, there may be other issues that need to be addressed. Here are some common problems and how to fix them:
- The chain or rod connecting the handle or lever to the flapper is too long or too short: Adjust the length of the chain or rod so that it is just long enough to allow the flapper to close completely when the handle or lever is released.
- The flapper is not sealing properly: Replace the flapper with a new one.
- The handle or lever is still loose: Tighten the nut that secures it in place.
Tips for maintaining your toilet handle or lever
To prevent your toilet handle or lever from breaking in the future, follow these tips:
Do not use excessive force when flushing the toilet
Using too much force when flushing the toilet can put unnecessary strain on the handle or lever. This can cause it to become loose or disconnected over time. Instead, flush the toilet with a gentle and consistent amount of pressure.
Do not use the handle or lever as a support when getting up from the toilet
Using the handle or lever as a support when getting up from the toilet can also cause it to become loose or disconnected over time. Instead, use a stable surface or grab bar to assist you when getting up.
Check the handle or lever regularly for signs of wear and tear
Inspect the handle or lever regularly for any signs of wear and tear, such as cracks, rust, or looseness. If you notice any issues, address them immediately to prevent them from getting worse.
Keep the toilet tank clean and free from debris
Debris in the toilet tank can cause the handle or lever to become stuck or malfunction. Regularly clean the tank and remove any debris to ensure proper function of the handle or lever.
Replace the handle or lever as needed
If you notice any signs of wear and tear that cannot be fixed, or if the handle or lever breaks again, it may be time to replace it. Purchase a new handle or lever and follow the installation steps outlined earlier in this article.
By following these tips, you can help maintain your toilet handle or lever and prevent it from breaking in the future. Remember to always address any issues as soon as possible to prevent further damage and inconvenience.
Related Questions
How to fix a broken toilet handle lever?
To fix a broken toilet handle lever, you can follow a few simple steps.
Can you repair a broken toilet handle?
Yes, a broken toilet handle can often be repaired.
What causes toilet levers to break?
Toilet levers can break due to wear and tear, excessive force, or debris in the tank.
How to replace a toilet tank lever?
To replace a toilet tank lever, you will need to purchase a new one and follow the installation instructions carefully.
Conclusion
Fixing a broken toilet handle or lever may seem like a daunting task, but with the right tools and knowledge, it can be a simple DIY project. By following the steps outlined in this article, you can save time and money by fixing the issue yourself. Remember to always prioritize safety and take caution when working with plumbing and electrical components. With regular maintenance and attention to detail, you can prolong the life of your toilet handle or lever and ensure proper function for years to come.


![How to Remove Crystallized Urine [Explained]](https://homepander.com/wp-content/uploads/2022/02/How-To-Remove-Crystallized-Urine.jpg)


![How To Clean Dark Grout That Has Turned White [5 Easy Ways]](https://homepander.com/wp-content/uploads/2021/12/How-To-Clean-Dark-Grout-That-Has-Turned-White.webp)