PEX pipes are an alternative to copper pipes. It has long been used for radiant heating systems. PEX tubing is sought after for water supply lines because it is easier and more straightforward to work with. PEX can be used for both commercial and residential plumbing.
Installing PEX pipes into your shower system is quite simple. All you have to do is drill the places where you want your water lines to be. Pull out the PEX pipes, and secure them. After that, check for any leaks or other complications, and if there are not any, connect them to the manifold. You should use separate colors for indicating hot and cold water lines.
We will come back to this further down the article but here’s a link if you want to see more about the replace shower drain without access below for instructions..
You can install a PEX pipe in any bathroom or shower of your choice. Wherever copper pipes or another type of pipe are used, you can use PEX pipe instead. PEX pipes are cheaper, more flexible, and come in a lot of variety.
By the end of this article, you will know how to plumb a shower with PEX.
How To Plumb A Shower With PEX: Step By Step
Step 1: Start With Drilling
Drill the stud and still plate. Drill through the sub-floor or still plate for each water line. You can do it for a hot and a cold, or you can only drill for a single line. It is important to drill each hole at the same level so that it parallels with the floor.
Step 2: Running The Water Lines
Run the water lines through the holes. In the majority of the cases, the lines come from the floors. Sometimes you have to take them from the walls. Be extra cautious at this step. It is recommended to drill the holes in the center so that it does not damage the pipes when it is time to hand the wallboard.
You can use a nail plate for this step. Line them up to cover screws, so they don’t penetrate the steel and damage the pipe.
Step 3: Pulling The Lines In Place
Pull the lines through the holes drilled and then run the other end to the place from where water will be coming. It is important to leave extra pipes on both sides.
Step 4: Securing The Lines
Use clamps to secure the lines to the joists. Do your best to keep the hot and cold lines apart. If they are very close, there will be a lot of heat transfer. Nobody wants that.
Step 5: Setting A Slack
You want to leave a little slack in the line for expansion and contraction. And then label the lines on both ends as you see fit.
Step 6: Placing A Rough Stub
Use a rough stub. A rough stub is a unique copper fitting stub that will adjust to the PEX pipes. If you look at the end, you will find there is a cap called rough fitting. It allows you to charge up the system with water or air to check if there are any leaks. Once the walls are up, cut the cap and install the finish valves.
Step 7: Applying Crimps
Applying crimps are the most critical part of your project. If crimps are not applied correctly, they can leak and cause further problems down the line. For perfection, cut the PEX straight, then slip a crimp ring into the pipe. After that, slide the pipe into the fitting. You can notice there are little shoulders on all fittings.
That’s where you put your PEX. Use slip-joint pliers to achieve maximum efficiency. You want to be as close as possible to the end of the pipe. To ensure leak-free crimps, it cannot be further than 1/8” to ¼”.
Step 8: Using PEX 90
It is time to rough in the lines to a fixture. You can use a fitting called PEX 90 that is place right into the mixing valve. Once it is cool enough, you can connect it to the PEX water line. Before soldering, remove any part that might get affected by heat.
Step 9: Soldering The Fittings
For positing the fittings in a way that they face down when the valve is hung. Finally, solder them into position, and be sure to let them cool completely.
Step 10: Positioning The Manifold
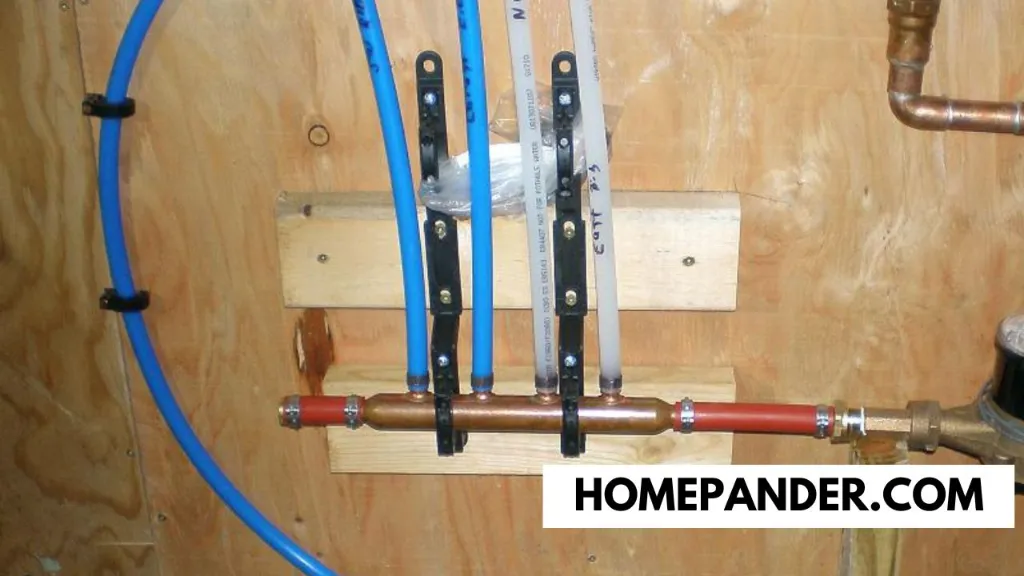
The waterlines at this point can be brought up. You can now connect them to the manifold. You want to position the manifold to eye level and then screw the top mounting brackets into the studs.
Always make sure it is safe and secure before proceeding. Attach the bracket to the manifold, and then attach the bottom bracket to the manifold. Check for errors.
Step 11: Aligning The Template
Align the template to the manifold and make a mark using a pencil, nails, etc. Drill all the holes perfectly. Be careful not to damage the manifold in the process. It is better to put the manifold aside before drilling.
Step 12: Attaching The PEX Ball Valves
After all the holes are drilled and the manifold mounted, you must connect the manifold to the PEX ball valves. Find the port and screw it carefully and properly. Always ensure that each line gets its shut-off valve.
Step 13: Pulling The PEX Lines
When the ball valves are properly secured in place, pull the PEX lines up and be careful not to kink them.
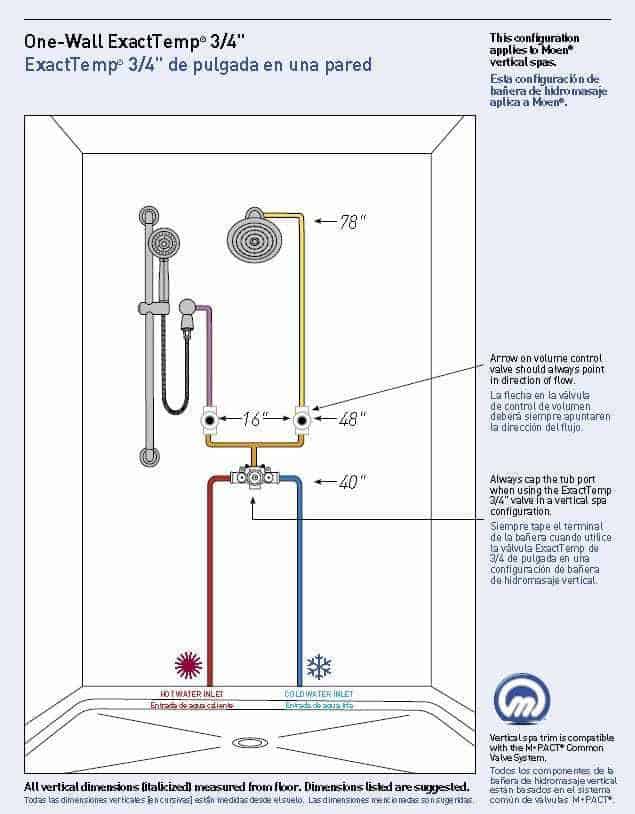
Shower Plumbing Diagram Pex Image Below:
Check our latest guide: How to Use Spray Foam Under a Shower Pan?
Also, read the related guide: How To Drywall Around A Shower Surround?
Related Questions
Can You Use PEX Pipe For Shower?
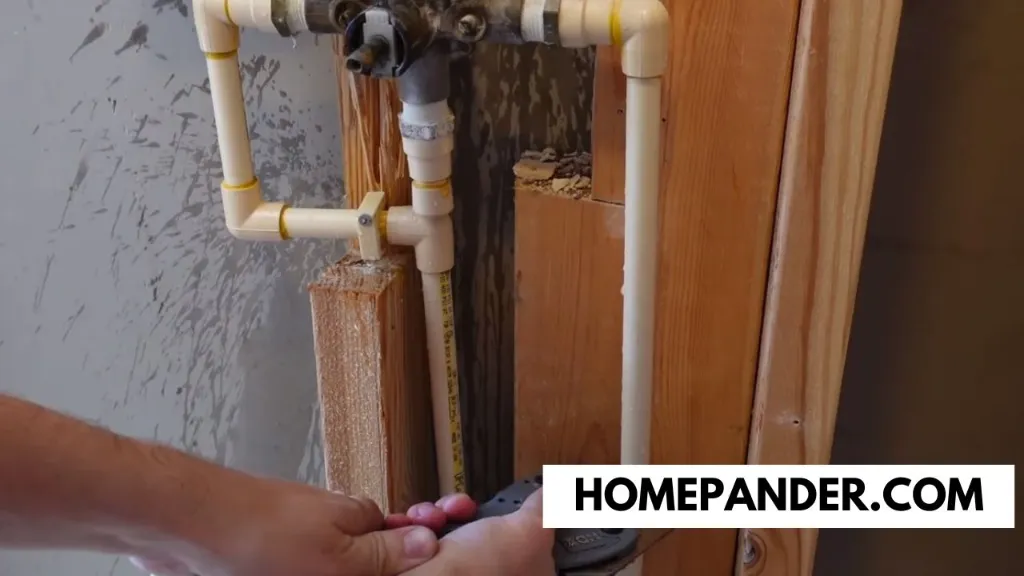
Yes, you can use PEX pipes for the shower. Given its numerous advantages using PEX pipes will be suitable for your plumbing system in the long run. The single good thing about PEX pipes for shower might be that it expands thus the complications created by hot and cold water does not exist. Also, there is a color-coded way to install hot and cold water lines in the shower, which makes them easier to distinguish.
There are three types of PEX pipes. PEX-A, PEX-B, PEX-C. The PEX-A is usually the most expensive of the lot. You can, although, use any of them. PEX-A, other than flexibility, has no significant benefit over the other two. PEX-B is slightly stiffer, and PEX-C is a bit more challenging to work with.
The only thing to look for during fittings is that you make the connection watertight. Some commonly used methods for making watertight connections include:
- Copper Crimping.
- Expansion connection.
- Stainless Steel Clamps.
- Compression fittings.
- Push-fit connections.
What Size Pex Pipe for Shower?
There is no actual limit to which you need to adhere to. However, 1/2 inch or ¾ inch is usually sufficient for a showerhead and a handhold. The 2.5 GPM flow rate is now built into the valve. PEX tubes usually range from 3/8 inches to 1 inch. For adequate water flow, it is often recommended to use ½ inch or ¾ of an inch.
When you replace your old supply line with new PEX pipes, you can use the old standards or the old measurement as a starting place. Because it is flexible and continuous, plumbers often use the manifold system for showers. Plumbers, when doing whole house manifolds, usually have blue valves on one side and red valves, indicating hot and cold lines.
There are specific other goals you need to keep in mind before choosing a size. Such as a narrower line will conserve water but fill your bathtub slowly. Though saving water is an admirable goal, not everyone will wait 15 minutes just to fill their tubs. You also have to consider pressure drop when choosing a PEX size. A 3/8 is sufficient for 250 feet length, 1/2 inch is sufficient for 350 feet, and a ¾ inch is good for up to 500 feet.
Can Hot And Cold PEX Lines Touch?
According to Dengarden, hot and cold water lines in any circumstances must not touch. You have to keep the hot and cold lines apart. One of the main reasons is they transfer heat. So hot pipe and cold pipe in close enough vicinity may just become warm water in both.
Another reason is in an ideal situation, PEX pipes can stand 200 degrees Celsius. However, in an actual life plumbing situation, the figure is around 180 degrees Celsius. In most cases, you will see the highest temperature written on the PEX package.
Can You Use Blue PEX For Hot Water?
According to SupplyHouse, the color of PEX does not matter at all. But for the sake of simplicity, it is usually avoided. Imagine a plumber comes in and confused the hotline for the cold line. Overall, you can use whatever color of PEX you want. There are many colors of PEX pipes available at the market.
Red ones are usually for hotlines, and blue ones are for cold lines. The other two options are white and grey. These two are mostly regarded as neutral colors, so that you may use them in a single water line.
Is It Ok To Bend PEX Pipe?
PEX pipes can be bent to accommodate better fittings. But there is a limit. You cannot bend the tubing rounder than a radius that’s 6x the size of the tube. Such as, ½ inch tube will allow for a 3-inch bend radius, whereas a ¾-inch will allow a 4 and ½-inch bend radius.
Can I Use Pex for Shower Valve?
Yes you can use pex for shower valve.
Here is a nice video on how to install pex shower valve and how to connect pex to shower valve.
First, you can simply purchase for the best shower valve for pex.
Parting Words
If you have read carefully till now, all the information provided should answer all your questions about how to plumb a shower with PEX. Plumbing is closely related to your health and the safety of your house. So it is wise to ask for professional assistance to install a shower valve with pix.






![How To Clean Dark Grout That Has Turned White [5 Easy Ways]](https://homepander.com/wp-content/uploads/2021/12/How-To-Clean-Dark-Grout-That-Has-Turned-White.webp)

![How to Remove Crystallized Urine [Explained]](https://homepander.com/wp-content/uploads/2022/02/How-To-Remove-Crystallized-Urine.jpg)
