
The wooden subfloor is incredible for hiding the sewage pipes and bringing an aesthetic look to your toilet. But, how to lay the subfloor around toilet flange that securely holds the toilet on the ground?
There are no myths about performing the job; instead of DIY skills, a few tools, a little energy, time, and patience.
Require some detailed instructions? Get in touch with us as we tailor this post to let you know all the steps with simple words. We can assure you that, once you complete reading this article, you’ll be able to lay a plywood subfloor around your toilet flange.
Why Should You Lay Subfloor Around The Toilet Flange?
Before laying the subfloor around your toilet flange, it’s essential to learn the necessity of laying the subfloor because it’ll help you to understand the importance of the subfloor and toilet flange installation.
The toilet flange bridges the main sewage pipe’s hole and the toilet bowl outhole. But, a typical toilet flange comes in 4×3 inches. Here it’s top wide is 4 inches and bottom wide is 3 inches. If there is no subfloor on the toilet, you can’t install the flange properly on the floor to hold the toilet.
The subfloor and toilet flange also work to withstand the toilet’s high moisture levels. Together, these prevent water seeping from the toilet wax ring during the increased flow of flushed water.
How To Lay Subfloor Around Toilet Flange?

There are two major works to lay a subfloor around the toilet flange. The first is removing the old subfloor and toilet flange, and the second is installing a new subfloor and toilet flange on the subfloor. We’ll discuss both works for your convenience.
Project Overview
- Estimated Cost- $40-$50
- Required Time- 1-2 Hours
- Skill Level- Intermediate
The Things You’ll Need
- Safety gear (Facemask, hand gloves, and goggles)
- Electric drill
- A mini hacksaw blade
- Screw gun
- Flat head screwdriver
- Measurement tape
- Pencil
- Carpenter Square
- Circular saw
- New plywood sheet
- New toilet flange
- Different sizes screws
- Toilet flange glue
Part A: Removing the old sub
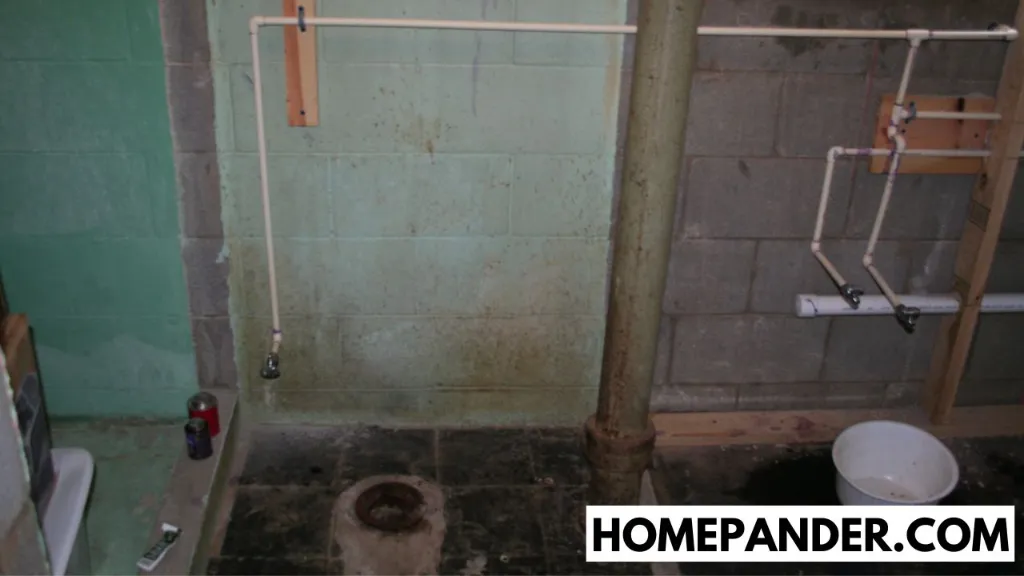
Until you remove the worn subfloor or broken toilet flange, it’s not possible to install the new one. So first, let’s learn about the old subfloor and flange removing steps.
Step 1: Prepare yourself
Wear all the safety gear to prevent swallowing plywood dust and inserting tiny particles into the eyes. As dust flies in the air, it’s better to keep yourself alert from these unexpected accidents.
Step 2: Remove the old flange ring
Get ready for your electric drill machine with a large drill bit and make a few holes around the ABS coupling of the flange. Precisely cut around the coupling with the hacksaw and unscrew the deck screws with a screw gun. Because these hold the flange on the subfloor, pull the metal ring to remove it.
Step 3: Remove the sewer inlet
Now, you can reach the sewer inlet of the flange. Cut around the inlet with the mini hacksaw. It may need several cuts, as it has been set on the subfloor due to its age.
After cutting the inlet, pry it with the screwdriver to loosen its attachment. If it won’t come with prying, use a hammer to break down the glue seal. Once the glue seal breaks, you can easily remove the coupling.
Step 4: Mark the damaged subfloor
Mark the straight edge area of the damaged subfloor with a carpenter square and pencil that you have to cut. You should keep the area large enough on each side to install the floor joist.
Step 5: Remove the subfloor
Usually, the thickness of the subfloor is ¾ inches, so you’ll need a powerful tool like a power circular saw to cut the wooden subfloor. Carefully set up the saw on the subfloor and run it to cut the subfloor without cutting the floor joists.
Once you cover cutting all the subfloor edges, hold it at the point of the toilet flange. Now, pull the subfloor towards you to remove it.
That’s the overall procedure of removing the old subfloor and toilet flange.
Part B: Installation of the new subfloor and toilet flange
If you feel tired by removing the subfloor, take deep breaths, and fuel yourself by sipping a cup of tea to go forward. If you like to complete the whole task simultaneously, keep following the steps below.
Step 6: Mount the floor joists
You have to mount the joists around the floor to ensure its stability. Install the joists by drilling the screws with the screw gun.
Step 7: Choose the plywood
After mounting the joists, you should prepare the plywood for the subfloor. You have to choose the plywood according to the exact measurement of your old subfloor.
If you find your old subfloor is a square shape of 12 inches by 12 inches, then you can choose the Craftiff Plywood Sheet Board. Because using this plywood helps you to avoid the hassle of measuring and cutting the subfloor plywood.
It is 1.5 mm thick, which makes it durable to hold the pressure of your toilet. On top of that, the package comes with 5 pieces of baseboard at an affordable price.
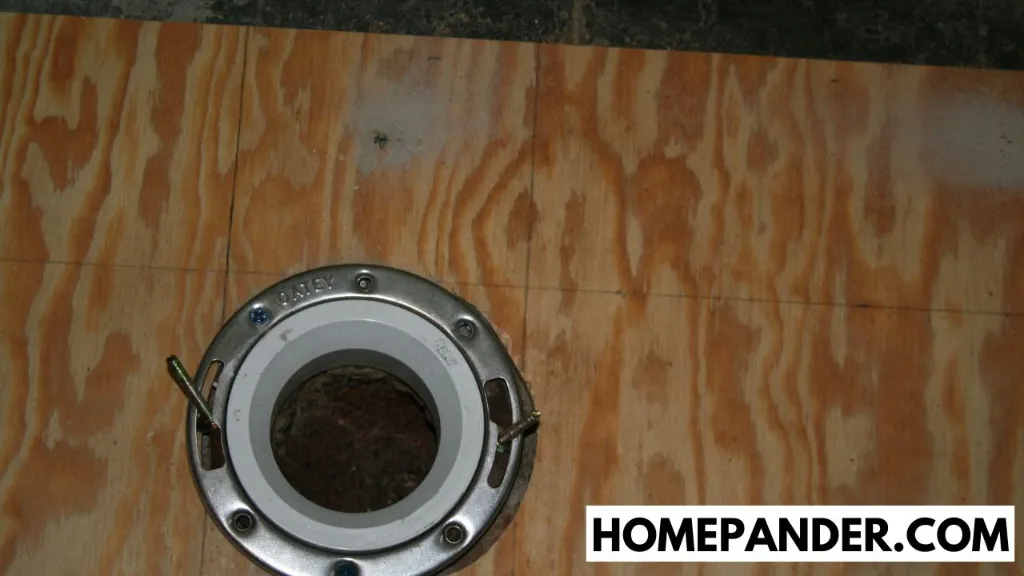
Step 8: Prepare the baseboard
Measure the center of the board and cut a hole with a saw based on the toilet flange shape. So that you can set the toilet flange after installing the board in place.
Step 9: Install the board in the place
Take the baseboard, set it in place, and secure its position by attaching screws with the screw gun. Here, you shouldn’t use the old screws you have removed, as they are already worn out due to rust.
Choosing new subfloor screws like DIY.TK Wood Screws will be the best option. They are built in Zinc plated carbon steel, making them durable, rust and corrosion resistant, and vital to secure the joints.
Moreover, they come in bulk in numbers and different sizes. So, you can use your required size screws. By purchasing one package, you can complete the subfloor installation with them even though a lot of screws remain.
Step 10: Install a new toilet flange
Use toilet flange glue in the toilet sewer inlet hole and toilet flange bottom end by grabbing its top. Then, properly place the flange with the mounting channel positioning at 9 and 3 o’clock. Screw down the flange to mount it tightly on the subfloor.
Step 11: Secure the flange screw for wax ring installation
Now, replace the carpet with the toilet’s base (If there is any). Carefully place the right flange screw in an upright position and then the left one. After that, put the wax ring on the flange and install the toilet on the flange screws.
Cost To Replace Subfloor Around Toilet Flange
Hiring a professional plumber to replace the subfloor around your toilet flange may cost you approximately $145 to $165. At first glance, it seems the cost is higher for this little task. But, the job requires a lot of power tools and equipment, which are expensive. That increases the entire expenditure.
The amount we mentioned, here the labor charge of the plumbers and the materials you need both costs are involved.
The expense varies depending on your location, the plumber’s skills, and the material’s quality. So, no need to count this figure as a fixed cost. Instead, consider it as an idea of the cost.
Is It Worth DIY Laying The Subfloor Around The Toilet Flange?
Sure, it is worth DIY to lay the subfloor around the toilet flange. But here are some conditions: having required tools at home, muscle on hand (as the toilet can weigh around 120 pounds) which is cumbersome to roam around, and previous experiences performing DIY jobs.
As you already have the tools, you won’t need to buy them. Buying the new subfloor,
toilet flange, glue, and some screws will cost this job. Where you have to invest $50 maximum. Investing your skills, 1-2 hours, energy and tools will save around $120.
Hopefully, you can easily understand why it is worthwhile to lay the subfloor around the toilet flange by yourself after getting this comparison between plumber cost and DIY cost.
But, if you can’t meet the conditions, it’s better to seek professional help to do the job without any hassle.
Some Tips To Avoid Accidents
Hacks always work as a lifesaver if you can efficiently follow them. Let’s learn some life-saving hacks.
- Always read the manual instructions before using the sharp power tool. Reading the manual will let you know the proper procedure to use the tools that won’t harm these.
- Don’t hurry when cutting, measuring, and installing the subfloor. It may make a gigantic mess and need more time and energy to complete the job instead of requiring less.
- Use suitable sizes or screws instead of small or large ones. Because too small or too large screws won’t fit into the subfloor and toilet flange holes and fail to provide snug fitting.
- Ensure enough air circulation into the toilet for proper breathing. You can run the exhaust fan of the toilet or open the door to pass the air.
- Ensure kids and pets have no entry into the toilet while working. As there, you have to deal with power tools; anything can happen due to little ignorance.
Related Questions
How to cut hole in the subfloor for the toilet?
By measuring the subfloor, mark it as an outline. Then use a circular saw over the mark to cut the hole.
What size hole to cut in the subfloor for toilet flange?
The standard toilet flange diameter is 3×4 inches. So you have to cut a 3 inches by 4 inches hole in the subfloor to install a toilet flange.
Does the toilet flange sit on top of the subfloor?
Yes, the toilet flange sits on top of the subfloor, and the bottom end sits into the inlet of the sewer pipe.
Parting Words
Laying the subfloor around the toilet flange isn’t a simple task like boiling water or a challenging job like learning codes. You’ll need moderate DIY skills and some tools at your fingertips to successfully do the job.
If you find it’s not challenging to install the subfloor around the toilet flange, we’ll appreciate going ahead. But, we suggest you hire a plumber with zero knowledge of the DIY job.


![How to Remove Crystallized Urine [Explained]](https://homepander.com/wp-content/uploads/2022/02/How-To-Remove-Crystallized-Urine.jpg)


![How To Clean Dark Grout That Has Turned White [5 Easy Ways]](https://homepander.com/wp-content/uploads/2021/12/How-To-Clean-Dark-Grout-That-Has-Turned-White.webp)