Cleaning bathroom tile grout can seem like a hassle. But leaving them uncleaned may lead to bigger problems.
And that’s why we’ve come here to save you from the problems.
So, how to clean bathroom tile grout?
Well, it’s much easier than it seems. You can start off by using commercial oxygen bleaches. If they’re unavailable in your area, baking soda and hydrogen may be a good options. You just have to apply, wait and scrub. But if you’re looking for something much easier then opt for baking soda and vinegar.
This information is more than enough for experienced homeowners. But if you’re a rookie, we suggest you dive into the details.
3 Methods to Make Your Grout Look As Good As New
Learning how to clean grout between bathroom floor tiles might seem intimidating to you. So to help you achieve your desired goal, we’ve come up with 3 fixes. Let’s see what they are-
Method-1: Using Oxygen Bleach
Having clean bathroom tiles and grout is a must for every homeowner. So, for your ease of learning, we’ve broken the entire process into 3 easy steps. Let’s get cleaning-
Necessary Equipment
Collect the following tools to save time and avoid issues-
- Safety gloves
- Clorox, Oxiclean or Bio Kleen
- Bucket
- Old toothbrush
Done procuring the equipment? Great! Now wipe all the dirt away!
Step-1: Prepare yourself
This is a very crucial step as we’ll be working with corrosive substances. Direct contact with the products might cause severe injuries. So, put on your safety gloves, and let’s get to work.
Step-2: Apply Desired Oxygen Bleach And Wait
Before starting the cleaning process, mix the chosen product with water, as per the manufacturer’s instructions. Then apply the product in affected areas and set your timer for 1 hour.
Step-3: Scrub With A Toothbrush And Rinse With Water
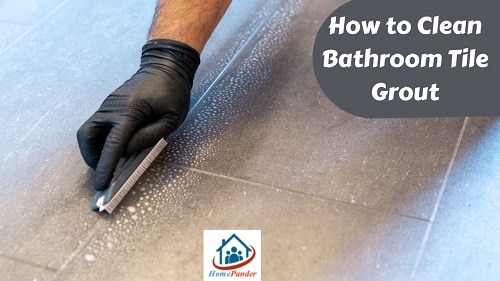
After an hour, grab a toothbrush and scrub all affected areas. This will help you get rid of grout stains and the mould on your tiles.
Once you’re done scrubbing, rinse the bathroom with water to get rid of the remaining product.
If this method doesn’t seem doable to you, jump into the next one!
Method-2: Using Baking Soda And Hydrogen Peroxide
Worried about how to clean kitchen wall tiles and grout? Then this method is perfect for you! We’ve divided this process into 3 quick steps, so let’s get on with them-
Necessary Equipment
We’ll be needing a few things for this method. Make sure you have them at hand-
- Baking soda
- Hydrogen peroxide
- Small bowl
- Old toothbrush
Done collecting the tools? Great! Let’s get down to business-
Step-1: Make Baking Soda And Hydrogen Peroxide Paste
This method is great for cleaning badly stained grout. Mix 4-5 tbsp baking soda and 2-3 tbsp hydrogen peroxide to make a thin paste.
Step-2: Apply The Paste And Wait
Apply the thin paste onto the grout. Apply some more peroxide if needed. Then wait for 15-20 minutes. While you’re waiting, boil 6-7 liters of water for the rinsing process.
Step-3: Scrub With Toothbrush And Rinse Off With Water
After 15 minutes, start scrubbing the affected areas with a toothbrush. Then proceed to rinse off with warm water.
If you want something much simpler, then hop to our next method!
Method-3: Using Baking Soda And Vinegar
This is our very last method. We’re sure you’ll learn how to clean white bathroom tiles and grout after this. So let’s get started-
Necessary Equipment
Before starting the process, make sure you have the following tools-
- Baking soda
- Vinegar
- Small bowl
- Old toothbrush
- Spray bottle
After collecting the tools, feel free to jump into the steps!
Step-1: Make And Apply Baking Soda-Water Paste And Scrub With A Toothbrush
Mix some baking soda and water in a bowl and stir the two to make a thick paste.
Apply the paste generously on the grout. Then grab a toothbrush and start scrubbing in a circular motion. Use a hard-bristled brush for best results.
As you’ll be needing baking soda, here are some great ones for you to choose from:
| Product-1 Arm & Hammer Baking Soda. | |
| Product-2 Mrs. Meyer’s Baking Soda Cream Cleaner. |
Step-3: Apply Vinegar-Water Solution
Once you’re done scrubbing, spray the area with a half-and-half mixture of water and vinegar. Let it bubble for 30 minutes and then scrub it again.
After you’re done scrubbing, rinse your walls with water. And that’s it, your bathroom tile should now be clean and shiny!
Special Tips
We want to make your cleaning experience hassle-free. So, to ensure better chances of success, here are some special tips-
Seal Your Grout
To keep your grout clean, seal it. Grout is porous and stain-prone. To confirm utmost protection, seal your cleaned tile grout. We advise you to seal the grout 1-2 times a year.
Clean With Microfibre Cloth
Grout can form grime a short while after cleaning. Buy a microfiber cloth for your bathroom and clean any grime that starts to appear. This will make your monthly cleaning much easier.
Stain Your Grout
If you can’t remove grout stains at any cost then opt for darkening them. There are various colorants you could use to stain the grouts. This will cover up the stains and make your grout look as good as new!
This is all for now. We hope our guidelines have made the cleaning process easier for you.
FAQs
Question: Is grout toxic?
Answer: Yes, grout is toxic. Grout made of cement is easily inhalable. And the small silica particles in the grout can irritate your lungs. So, even a small amount of silica dust can pose a health risk.
Question: Can I use bleach to clean grout?
Answer: No, you can’t. Bleach is extremely corrosive. It might seem like the bleach is cleaning your grout. But in reality, it’s stripping off the top layer of your grout.
Question: Can toothpaste be used as a grout cleaner?
Answer: Yes, you can. We suggest you use white, non-gel toothpaste to clean your grout. Follow with some liquid dish soap and water for the best result.
Conclusion
You’re certainly familiar with how to clean bathroom tile grout in 3 different ways now. We hope you found our guidelines easy. Try the methods out yourself and send us some feedback.
Good luck with the stubborn spots! Au revoir!






![How To Clean Dark Grout That Has Turned White [5 Easy Ways]](https://homepander.com/wp-content/uploads/2021/12/How-To-Clean-Dark-Grout-That-Has-Turned-White.webp)

![How to Remove Crystallized Urine [Explained]](https://homepander.com/wp-content/uploads/2022/02/How-To-Remove-Crystallized-Urine.jpg)
