Living in a house for a long time ends up leading to the need of fixing this and that every few years. The bathroom is one such area. It may not need an overall fix as much as other areas but the water can damage a lot of things over time.
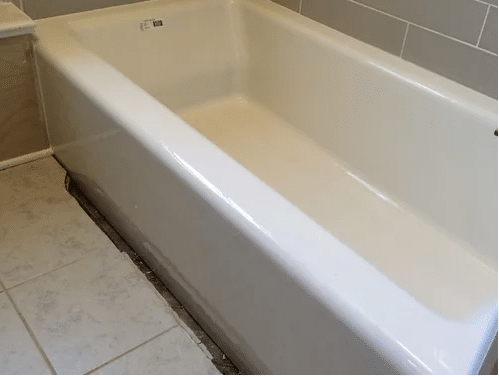
One of the most common issues that you may notice is gaps that keep appearing here and there. It can be between the ceramic things (like bathtub or sink) and the floor or wall.
So, if you know how to fix large gap between tub and floor or other issues like this, it comes in handy. That’s why, in today’s article, I’ll help you know how to fix gap between tile and tub and other things.
Here I’ve talked about how to remove shower surround and replace it with tile in details.
| Steps | Instructions |
|---|---|
| 1. | Assess the gap: Measure the width and depth of the gap between the tub and the floor to determine the extent of the problem. |
| 2. | Identify the cause: Determine the cause of the gap, which could be due to settling of the house, improper installation, or wear and tear over time. Understanding the cause will help you determine the best solution. |
| 3. | Clean the area: Thoroughly clean the area around the gap, removing any debris, dirt, or old caulk to ensure proper adhesion of the repair materials. |
| 4. | Choose a repair method: Depending on the size and cause of the gap, choose an appropriate repair method. Options may include using caulk, expanding foam, or installing a filler strip. |
| 5. | Apply caulk: If the gap is relatively small, you can use caulk specifically designed for use in bathrooms or kitchens. Apply a continuous bead of caulk along the gap, making sure it fills the entire space. Smooth the caulk with a caulk smoothing tool or a damp cloth to create a neat finish. |
| 6. | Use expanding foam: If the gap is larger or irregular in shape, you can use expanding foam filler. Follow the manufacturer’s instructions for application, as foam expands as it dries. Trim the excess foam with a utility knife once it has fully cured, and then apply a layer of caulk over the foam for a finished look. |
| 7. | Install a filler strip: For larger gaps or if you prefer a more permanent solution, you can install a filler strip made of wood or PVC. Measure and cut the filler strip to fit the gap, and then attach it securely using construction adhesive or screws. Sand and paint the filler strip to match the surrounding area for a seamless appearance. |
| 8. | Allow for proper drying/curing time: Depending on the repair method you chose, allow the caulk, expanding foam, or filler strip to fully dry or cure according to the manufacturer’s instructions before using the tub or applying any additional finishes. |
| 9. | Regular maintenance: Once the repair is complete, periodically inspect the gap between the tub and the floor for any signs of future gaps or damage, and address any issues promptly to prevent further gaps from forming. |
How To Fix Large Gap Between Tub And Floor?
Any gap bigger than ¼ or ½ inches is considered to be a large gap. So, what would you do for gap between tub and floor that are very large? Well, here is a step-by-step guideline on how to caulk large gaps around tub.
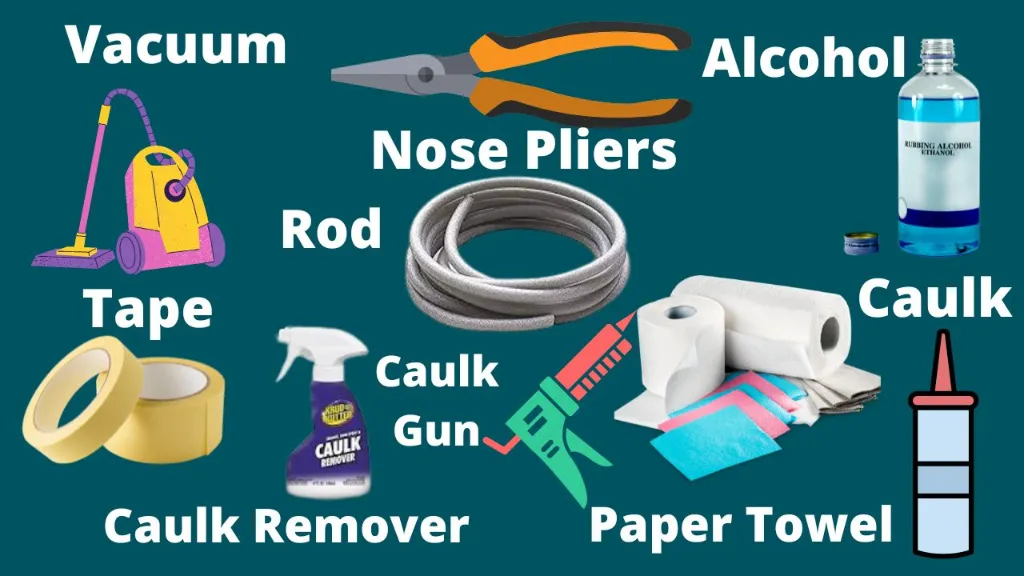
Things You Will Need
- Chemical caulk remover.
- Needle-nose pliers.
- Vacuum.
- Rubbing alcohol.
- Painter’s tape.
- Caulk backer rod.
- Caulk.
- Caulk gun.
- Paper towel.
Step One: Remove Old Caulk
You should never put new caulk over old ones. That’s why the first step is to start with removing the old remaining caulks.
To remove them, you need to use chemical caulk remover which you can purchase from any hardware store. Spread the removers over the old caulk and let them soften.
Alternative: If you don’t have chemical caulk remover, you can use a razor scraper and putty knife. You can also use a hair dryer on high heat and heat the caulk areas to soften them before scraping.
Once the chemical or the hair dryer softens the old caulk, use a needle-nose plier or sharp razor blade to scrape out or remove the caulk. Sometimes a whole big section comes loose if it is done right.
Step Two: Clean The Area
Vacuum out any remaining dirt from under the tub through the gap and clean up the area with rubbing alcohol. Then wait for it to dry completely. If there is any water or dirt left, the caulk will not seal the gap properly.
Step Three: Insert Caulk Backer Rod
Never fill out large gaps only with caulk because it will not fill the gap fully. You need to insert caulk backer rods to fill the inner area so that there will be no vacant remaining inside. If it does, the caulk molding will crack over time and you will have to re-fix it.
Step Four: Mask With Painter’s Tape And Prepare The Caulk Gun
Keeping a straight line, spread the painter’s tape ⅛ inches away from the gap. It will work as a line guide and will prevent the caulk from spreading on unnecessary areas.
Then, prepare your caulk gun by cutting a small hole on the tip of the cartridge. The hole has to be wide enough to fill the gap well.
Step Five: Fill The Gaps And Straighten It
Squeeze gently on the caulk gun’s trigger and fix the gap between tub and floor. After that, you can straighten the caulk using your finger. If you are using silicon-based caulk, don’t forget to wipe your fingers on a sponge or paper towel every time you straighten the caulk.
Step Six: Clean Up And Let It Dry
Once you are done, remove the painter’s tape and see how perfect the line looks. Then clean up your working area. You have to wait 24 hours for the caulk area to dry completely before you use the tub.
How To Install Quarter Round Around Bathtub?
A quarter-round looks like a quarter of a round and thus it got its name. It can be both wooden and adhesive.
While wooden quarter rounds are suitable for floor, door, or wall areas, I don’t recommend installing them around the bathtub for two reasons.
- The water can damage the wood.
- Wooden quarter rounds mostly require nailing. And it will ruin the tub.
What I recommend is vinyl or PVC quarter round. They are available both in wooden print or various colors. Installing quarter rounds around a bathtub is very easy too. You can install it in the following way:
- Measure the required length you need.
- Mark the quarter round with a pencil and cut it.
- Place the quarter round about ¼” far from the bathtub. This will help the sealer or adhesive get in and fix it well.
- You can use any liquid nail adhesive you want as long as it is strong enough. This will set the quarter round around the bathtub. Here I have written an article on how to fix a broken bathtub faucet handle.
- Finally, you can use caulks to seal the top, bottom, and other areas of the quarter round that shows the gap.
Caulk And Caulking: What It Is And How It Works?
Caulk is a sealing material that is made from different types of bases, such as silicon, acrylic latex, rubber, and polyurethane. This material is very effective to seal gaps between structures to prevent air, water, dust, or insects from getting in.
Acrylic caulk works better on doors, and window panels while rubber caulk works best on water tanks, swimming pools, and chemical storage. On the other hand, both silicon and polyurethane caulk works well on toilets, sinks, bathtubs, etc.
Is Caulking Around The Bathroom Necessary?
There is a small debate going on all the time about whether or not caulking is necessary. Some experts would say it might not be necessary but others and DIY project lovers find this helpful and necessary.
The reasons it is said to be unnecessary are:
- It prevents you from identifying leakages around the bathroom
- Sealing the water with caulk damages inside as it traps the water inside the leakage
And then, the reasons it is said to be necessary are:
- Bathrooms are a place to clean up and we always end up leaving a bit of dirty water here and there. It ends up spreading a stinky smell around the bathroom. Sealing certain places prevents the water from storing in certain areas and getting smelly.
- Lack of caulking often creates gaps between the ceramic areas like the wall and sink or tub. If not being careful, one can get injured by these uneven areas. Besides, leakage of dirty water can also be prevented by it.
Frequently Asked Questions
Here are some of the frequently asked questions regarding caulking and fixing that you might find helpful.
Can You Make Caulk At Home?
Yes, you can make caulk at home. In order to do so, you will need:
- Baking soda.
- Wood glue.
- Tube dispenser.
The process to make your own caulk is to mix 2-3 tablespoons of baking soda with the required amount of wood glue to make a mixture thick enough to work. You can either apply it using a tube dispenser to create a more flawless work or can apply it with spoons or popsicle sticks.
But it is to be noted that homemade caulks are not long-lasting. The effect can wear off over time and you would have to reapply it.
What Is The Best Way To Fix Gaps With Caulk?
To get the best result you need to follow a few steps:
- The area you are caulking in needs to be clean and free from dirt or dust.
- Make sure the place you are fixing is dry. Caulk will not settle if the gap is wet.
- Attach the tube or nozzles to the caulk gun. You can spread the caulk on the necessary areas by gently squeezing the trigger of the gun.
- Use caulk tools to make sure it covers all the areas you need to fix.
- Don’t forget to keep the gun on a paper towel or rug so that it won’t spread anywhere else.
- And don’t forget to keep the nozzle cap on. Otherwise, the caulk will dry off.
How Can You Remove Caulk?
You will get to buy caulk removers from stores. According to the instructions, you need to wait a few hours after applying the remover on caulks.
But sometimes it takes much longer, especially when the caulks are old. So it is recommended to leave the remover overnight and then use caulk removing tools to remove them. If you don’t have any chemical remover close to your hand, you can use a sharp razor blade and scraper if the caulk is relatively new.
What could be the cause of a large gap between my tub and the floor?
There could be several causes for a large gap between a tub and the floor, such as settling of the house, improper installation of the tub, wear and tear over time, or changes in the flooring.
Can I use regular caulk to fill the gap between the tub and floor?
Yes, you can use caulk specifically designed for use in bathrooms or kitchens to fill small gaps between the tub and floor. However, for larger gaps, other methods such as expanding foam or a filler strip may be more effective.
How do I choose the best repair method for fixing the gap?
The best repair method will depend on the size and shape of the gap, as well as the cause of the gap. Smaller gaps can be filled with caulk, while larger or irregular gaps may require expanding foam or a filler strip for a more permanent solution.
How do I properly apply caulk to fill the gap?
To properly apply caulk, first clean the area around the gap, then apply a continuous bead of caulk along the entire length of the gap. Use a caulk smoothing tool or a damp cloth to smooth the caulk for a neat finish.
Can I use expanding foam to fill the gap between the tub and floor?
Yes, expanding foam can be used to fill larger or irregular gaps between the tub and floor. However, it’s important to follow the manufacturer’s instructions for proper application and allow the foam to fully cure before trimming and finishing with caulk.
How do I install a filler strip to fix the gap?
To install a filler strip, measure and cut the strip to fit the gap, and then attach it securely using construction adhesive or screws. Sand and paint the filler strip to match the surrounding area for a seamless appearance.
How long should I wait for the repair to dry or cure before using the tub or applying additional finishes?
The drying or curing time will depend on the repair method and the manufacturer’s instructions. It’s important to allow the repair materials to fully dry or cure before using the tub or applying any additional finishes to ensure a durable and effective repair.
How often should I inspect the repaired area for future gaps or damage?
It’s recommended to periodically inspect the repaired area for any signs of future gaps or damage, and address any issues promptly to prevent further gaps from forming. The frequency of inspections will depend on the usage and condition of the tub and floor, but a regular maintenance schedule is recommended.
Conclusion
A bathroom is a place where you want to have a peaceful moment as you shower. You don’t want to worry about moisture, gaps, or molds when you shower. It is enough to trigger anyone with OCD.
Most people choose to solve these fixing issues by themselves as it saves money and fun to work sometimes. And now that you know how to fix large gap between tub and floor, you will be able to fix these small issues by yourself from now on.
But, before I end this article, here is a small tip: you will find caulk of different colors. However, it is classier to go with the white one. It will shine well around your bathroom.
Good Luck with the process on how to fix the large gap between tub and wall.




![How To Clean Dark Grout That Has Turned White [5 Easy Ways]](https://homepander.com/wp-content/uploads/2021/12/How-To-Clean-Dark-Grout-That-Has-Turned-White.webp)

![How to Remove Crystallized Urine [Explained]](https://homepander.com/wp-content/uploads/2022/02/How-To-Remove-Crystallized-Urine.jpg)
