
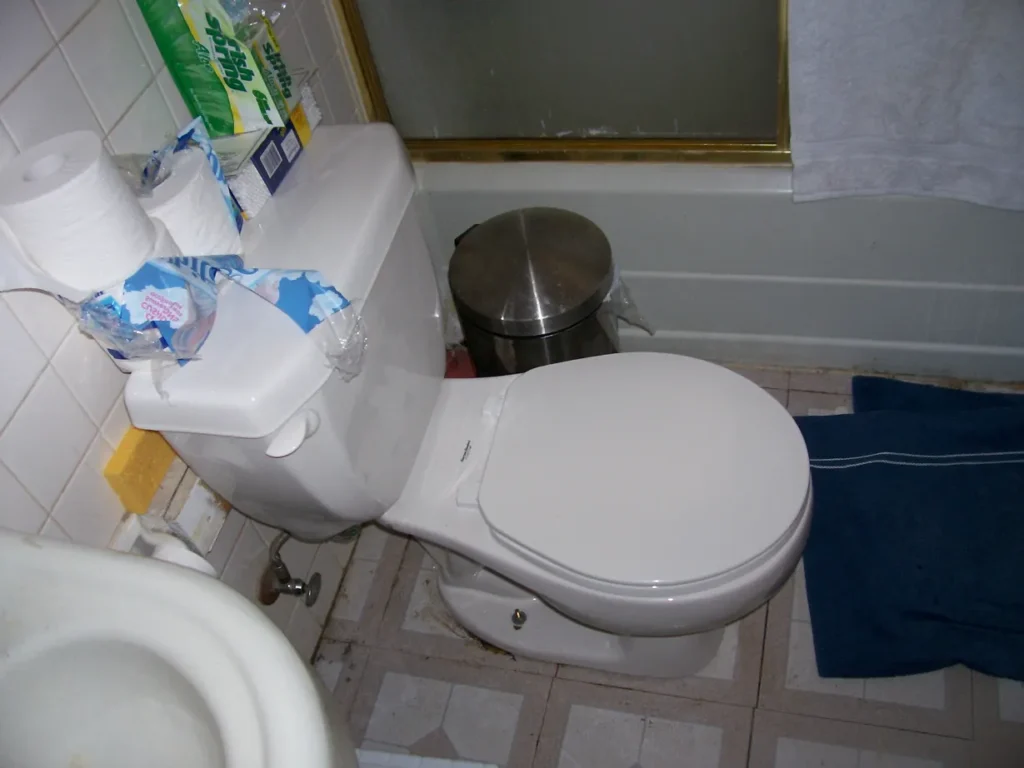
A puddle toilet base for water leaking is enough to make your fine morning terrible. Not only that, it makes your toilet dump, which damages the toilet base floor, and increases the chance of slippery falling. Moreover, your water bill will be higher due to water wastage.
So, whether you use a typical toilet or a universal rundle toilet, it’s true in both cases. Are you facing your universal rundle toilet leaking?
Water condensation, loose water supply hose pipe, loose toilet base bolts, loose tank and bowl connection, cracked toilet base, faulty toilet seals, or faulty wax ring are some common reasons for toilet water leaking.
In this post, we’ll describe all the probable causes, how to rectify the cause, solutions considering the reasons, tips to prevent water leakage, and FAQs. Trust us, reading this post will add some value to your DIY toilet repairing skills.
Why Is The Toilet Leaking From The Bottom?
Yes, finding a problem’s specific causes is challenging and time-consuming. But, it’s not that challenging when we talk about universal rundle toilets leaking. You can find the issue with close observations of your toilet, as you can see most of them from the outside.
1. Water Condensation
Do you live in a more humid city in the USA like San Francisco, Washington, or New York? If so, condensation water shooting may be one of the common reasons. The moist air may condense from the outer surface of the toilet bowl and tank.
When the humid air forms drops of water and that accumulate, you’ll see the water in the toilet base. It also can happen to the tank’s water and the washroom’s different temperatures.
How To Determine It’s The Reason
Check the tank’s water temperature and the room’s temperature. If the water is colder than room temperature and forms water drops within a few seconds, then it may be the culprit.
How To Solve
It isn’t tricky to solve the toilet leaking problem for water condensation, as there are multiple methods to solve this issue on how to stop toilet condensation.
The Things You’ll Need
For method 1
- A sponge or a paper towel
For method 2
- A water drip tray
For method 3
- A bathroom exhaust fan
Project Overview
For method 1
- Estimated Cost- $0
- Required Time- 5 minutes
- Skill Level- Beginner
For method 2
- Estimated Cost- $15
- Required Time- 10 minutes
- Skill Level- Beginner
For method 3
- Estimated Cost- $80
- Required Time- 40-60 minutes
- Skill Level- Moderate
Method 1: Cleaning the toilet
First, clean the water by wiping the toilet base from up to down with a paper towel or sponge. Next, squeeze the sponge, and tap the base until the floor is arid.
Method 2: Installing a water drip tray
You mustn’t like to do the same thing frequently. You can add a water drip tray below the toilet tank. So the water will be accumulated in the tray. When it is full of water, just remove the water from the tray. It’s super easy to install a water drip tray, as it won’t require any tool and previous experience.
Method 3: Installing a bathroom exhaust fan
If you find it irritating to clean the toilet tank dip tray, installing a bathroom exhaust fan can be your savior. However, if you already have one, maybe that won’t work correctly. So replace it with a new one.
But installing or replacing a bathroom exhaust fan isn’t that much easy, as it requires some electric and plumbing DIY skills. So we recommend you to call a professional plumber to help you.
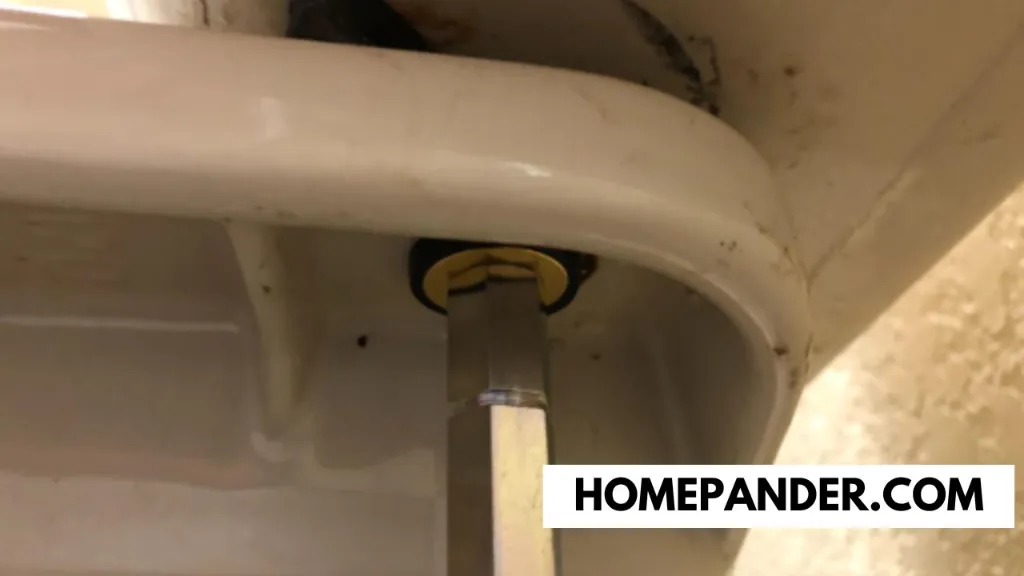
2. Loose Toilet Tank Supply Line
There is a main hose pipe below the toilet tank, which is connected to the tank to supply water into the tank. If that is loosened, water will obviously seep through the loose joint.
Initially, you may think it’s not a big deal, but in the long run, it’s a problem when you don’t use the toilet for many hours during the day or at night.
The water drippings will create a puddle at the base of the toilet. And you can discover it in the morning when you enter the toilet to freshen yourself.
How To Determine It’s The Reason
Try to rotate the hose pipe, and if you can, then maybe the pipe is loose. If not, the hose pipe may be adequately secured. So check the next option to identify why there is water in the toilet base.
How To Solve
First, detect why the hose pipe is loose. If that is without any reason, you can solve the issue by tightening it. But if that is due to rust and stains, which damage the pipe, you need to replace it.
The Things You’ll Need
For method 1
- an adjustable wrench
For method 2
- A toilet hose pipe
- an adjustable wrench
Project Overview
For method 1
- Estimated Cost- $0
- Required Time- 2 minutes
- Skill Level- Beginner
For method 2
- Estimated Cost- $20
- Required Time- 10 minutes
- Skill Level- Beginner
Method 1: Tighten the pipe
- Try to tighten the hose pipe manually by turning it right to the left.
- You can also use an adjustable wrench to secure it properly, which ensures no water seeping.
Method 2: Replace the pipe
- To replace the pipe, you must buy a new hose pipe from your nearest sanitary shop or online.
- Shut off the primary water source and remove the old tank supply line from both ends with an adjustable wrench.
- Now reverse the process to attach the new tank pipe with the primary water supply source and tank.
3. Clogged Drain Line
Sometimes water leaks from the toilet base because of a slightly clogged drain line. The toilet may be partially clogged due to unintentional flushing sand, a blob of toilet tissue, or solid particles except for human wastage.
Unless it is entirely blocked, the water will slowly go down. That’s why you can’t see overflowing water in the toilet bowl. But, when you flush the toilet, the water will leak with the toilet wax ring due to the high pressure of the flushing water.
How To Determine It’s The Reason
Back-to-back flush your toilet 2-3 times, and observe the water drainage flow. If the water goes down instantly, the toilet drain line is okay.
But if the water slowly drains through the toilet outhole, keep your eye on the toilet base. If the water leaks on the toilet base, it may be due to a clogged toilet.
How To Solve
There are multiple home products including baking soda, white vinegar, Coca-cola etc that you can use to unclog a clogged toilet. As the easiest hack, here we share how to clean a clogged toilet with Coca-Cola.
The Things You’ll Need
- A can of Coca-cola
Project Overview
- Estimated Cost- $16
- Required Time- 20-30 minutes
- Skill Level- Beginner
Process
- Pour a can of Coke into the toilet bowl and wait 20-30 minutes. Since it contains phosphoric acid, it can incredibly break and dislodge clogs.
- After that, flush your toilet and see the magic. Your toilet is now clog-free..
4. Cracked Toilet Bowl

Though toilet bowls are sturdy enough to last a long time, anything can happen anytime. For example, if something falls on the toilet base, its high impact may crack the toilet. The crack can be like a hairline or go deep. However, maybe the water leaks from the bottom due to that crack.
How To Determine It’s The Reason
If you inspect the toilet base closely like a detective, you can find the hairline crack. But if the crack is deep enough, you don’t need to struggle to find it. Instead, just notice it, the crack seems to look at you.
How To Solve
For repairing a hairline crack, applying waterproof silicone caulk is the best option as it seals the crack and protects against water leakage. But if the crack is deep, you should change the toilet because sealing the crack won’t be worth it. If the crack is deep and wider than 1/16 inches, it’s better to replace the entire unit instead of the toilet bowl.
The Things You’ll Need
For method 1
- Waterproof silicone caulk
- A putty knife
For method 2
- An entire toilet unit
Project Overview
For method 1
- Estimated Cost- $10
- Required Time- 5 minutes
- Skill Level- Beginner
For method 2
- Estimated Cost- $20
- Required Time- 10 minutes
- Skill Level- Beginner
Method 1: Sealing the crack
- First, open the cap of the Gorilla caulk, and attach its nozzle.
- Next, apply the caulk to the crack and spread it with a putty knife.
- Wait 20-30 minutes to dry out and 24 hours to fully cure the caulk.
Method 2: Replacing your toilet
Replacing a toilet isn’t a DIY job, as it needs expertise. So call a professional plumber to help you.
Pro Tips
- Depending on your locality, replacing a toilet bowl may cost around $70 to $100. If you replace the entire toilet, it may cost you $220 to $530.
- Choose a High-Efficiency Toilet (HET) unit to prevent getting your toilet pink, sky-blue, or avocado within some days of use. It also saves approximately 95 liters of water, which saves water wastage, indirectly your cash.
5. Defective Flush Lever Handle

If the flush lever handle is loose or defective due to many uses, it may leak water from the toilet tank. However, there are also two more reasons for leaking water from the toilet handle.
If the tank’s water level is overflowing for a faulty universal rundle toilet flapper refill mechanism, or water is sprayed from the overflow tube. No matter for which reason water leaks from the flush lever handle, that will go down to the toilet base.
How To Determine It’s The Reason
Closely inspect the flushing lever handle for primary investigation. Then, if it’s okay, open the water tank lid. Finally, check the water level of the tank and the overflow tube. Most probably, if the water leaks due to the flush lever, you can detect it by doing these three things.
How To Solve
First, check if the flush lever handle is loose or not. If yes, you have to tighten it. But if it is defective for catching rush, then there is no other option instead of replacement. And if the reason is for faulty overflow tube or refill mechanism, then you have to replace these.
The Things You’ll Need
For method 1
- An adjustable wrench
For method 2
- An adjustable wrench
- A new toilet lever handle
Project Overview
For method 1
- Estimated Cost- $0
- Required Time- 5 minutes
- Skill Level- Beginner
For method 2
- Estimated Cost- $12
- Required Time- 20 minutes
- Skill Level- Beginner
Method 1: Sealing the crack
- Open the tank lid and reach the flush lever handle nuts.
- Attach the nuts with a wrench, and rotate it right to the left. That’s all.
Method 2: Replacing your toilet
- Open the tank lid and remove the lever handle from the toilet valve chain.
- Attach the handle nuts with a wrench, and loosen them.
- Carefully remove the toilet lever handle from the tank and throw it in the waste bin.
- Pick the new slide mount toilet lever handle by inserting its grip into the tank.
- Insert the nuts through the handle, and secure it with the wrench.
- Attach the handle with the flush chain.
- Push the toilet lever handle to check the flushing system is okay and won’t leak water.
- Close the toilet tank lid.
Method 3: Replacing overflow tube
If water leaks due to the toilet tank’s faulty refill mechanism, or overflow tube, you can check this article. There we have discussed a detailed guideline on it.
6. Loose Or Rusty Toilet Seat Hinge Bolts
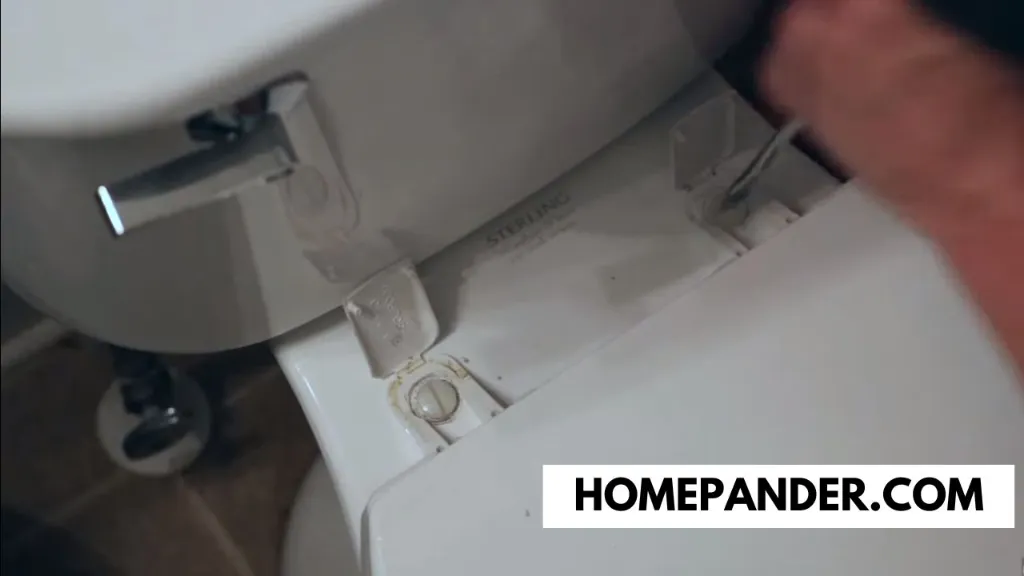
Two bolts are used to attach the toilet seat to the toilet bowl. You have to change the seat’s position when you use and leave the toilet. So the bolts may become loose due to repeated use.
When you flush the toilet and water comes out from the toilet rim. It creates a heavy water flow. This overflowing may leak water from the loose or rusty toilet seat bolts.
How To Determine It’s The Reason
Keep your eyes on these bolts and flush your toilet 2-3 times. If you find water comes out from the bolts, this is the issue of water leakage. If not, you have to consider that the bolts are tightly secured.
How To Solve
Tightening the loose bolts or replacing the rusty bolts are two of the common solutions of this issue.
The Things You’ll Need
For method 1
- A flat screwdriver
- An adjustable wrench
For method 2
- A flat screwdriver
- An adjustable wrench
- Universal toilet hinge bolts
Project Overview
For method 1
- Estimated Cost- $0
- Required Time- 5 minutes
- Skill Level- Beginner
For method 2
- Estimated cost- $6
- Required time- 10 minutes
- Skill Level- Beginner
Method 1: Tightening the bolts
- The bolts are sealed with dome-shaped plastic caps. So first, you have to pry away the lids with the screwdriver to reach the bolts.
- Grab a bolt with the screwdriver and attach the wrench with its nut from the bottom.
- Now rotate the nut clockwise until the bolt fits snugly.
- Repeat the process for all the bolts.
Method 2: Replacing the bolts
- Loose a bolt by holding it with a flat screwdriver and wrench.
- Now remove it and do the same thing for all bolts.
- Pick your one of your new universal toilet seat bolts and remove its nut.
- Insert the bolt into the seat hinge hole, and insert the nut from its bottom end.
- Do the reverse to tighten the bolt.
7. The Loose Toilet Tank And Bowl Connection Bolts
Usually, the toilet tank and bowl are separate parts of a toilet. The tank is connected to the toilet bowl with some bolts and a gasket. If one or all bolts are loose or the o-ring gasket cracks over time, may be the toilet leaking where water connects. So you find the accumulated water in the toilet base.
How To Determine It’s The Reason
Inspect the toilet tank and bowl attachment bolts. If that is secure, it’s okay. But if the bolts are loose, it may cause water leakage.
The second trick is to grab the tank and wiggle. If it starts wobbling, maybe the bolts are loose, or the gasket is damaged.
How To Solve
If the bolts are loose, you can solve the issue by tightening them. But, if the gasket is worn out, you need to replace the gasket.
The Things You’ll Need
For method 1
- A sponge
- A screwdriver
- An adjustable wrench
For method 2
- A sponge
- A screwdriver
- An adjustable wrench
- A disposable plastic bag
- A rag
- A universal rundle toilet repair kit
Project Overview
For method 1
- Estimated Cost- $0
- Required Time- 10 minutes
- Skill Level- Beginner
For method 2
- Estimated Cost- $15
- Required Time- 25 minutes
- Skill Level- Beginner
Method 1: Tightening the bolts
- Shut off the main water source and flush the toilet to drain the tank’s water.
- Open the universal rundle toilet tank lid and if there is any water in the tank, soak it up with a sponge.
- Grab a bolt with a screwdriver, and from the tank’s bottom, attach a wrench with the blot’s nut.
- Now tighten it, and do the same thing for all the bolts.
- Reconnect the water source and fill the tank with water.
- Finally, flush your toilet to check whether the water leaks or not.
- If not, the water leaked due to loose bolts, and you solved it.
- If yes, the gasket may be defective, and you have to change it.
Method 2: Replace the tank gasket
- Turn the main water supply knob left to shut off.
- Flush the toilet to drain the water and soak up the extra water with a sponge.
- Unscrew the water hose pipe with a wrench from the tank.
- Loosen the tank’s bolts that you tightened earlier to remove them.
- Remove the tank from the toilet bowl to reach the old gasket.
- Remove the gasket and keep it in the plastic bag.
- Remove all the debris from the tank’s bottom and the bowl’s top with a dry clean rag.
- Pick the new gasket and insert it into the center of the drain hole.
- Replace the tank over the bowl, ensuring the proper alignment of the tank’s bolt hole.
- Slide the bolts from top to down through the holes and screw the bolts’ nuts with a plier.
- Place the tank’s lid on it and reconnect the water supply hose pipe.
- Turn on the water supply source and fill up the tank.
- Flush the toilet to make sure your attempt is worthwhile.
8. Loose Or Rusty T-Bolts

The toilet bowl is attached to the ground through one right side and one left side Tee bolt and nut. Though these bolts and nuts are metallic, they may be loosened over time. They may even catch rust and damage. So when you flush the toilet, the water will seep from the sewer pipe through the loosened bolts.
How To Determine It’s The Reason
Flush the toilet 2-3 times and keep a close eye on the T-bolts. If you notice, water comes out with the bolts for its high flowing; the T bolts are loose.
Or Grip the toilet, and try to wiggle it from side to side. If it wiggles, you should consider that the T-bolts are loose. However, if they catch rust, you can notice a lot of rust stains on the bolts.
If, after doing all these three things, you find the toilet bowl is okay, then the problem may be elsewhere.
How To Solve
There are two options for fixing water leakage from the T-bolts. One is tightening the loose bolts or and the other is replacing the rusty bolts.
The Things You’ll Need
For method 1
- A flat screwdriver
- A vise grips
- An adjustable wrench
Project Overview
For method 1
- Estimated Cost- $0
- Required Time- 5 minutes
- Skill Level- Beginner
Method 1: Tighten the T-bolts
- The Tee bolt is covered with a dome-shaped plastic cap. Pry it with a flat screwdriver to reach the right side blot. Do the same thing for the left side bolt.
- Attach the vise grips on top of the right side bolt to secure it. Otherwise, if you rotate the nut, the entire bolt will rotate.
- Now, attach a wrench with the nut and turn it right to the left. Don’t put too much pressure on the bolt, as it may crack the toilet porcelain.
- Following the same thing, tighten the left side T-bolt.
Method 2: Replacing the T-bolts
If you need to replace the bolts, you have to remove the toilet itself. We describe the process below for replacing a damaged wax ring. Check there.
9. Worn Wax Ring
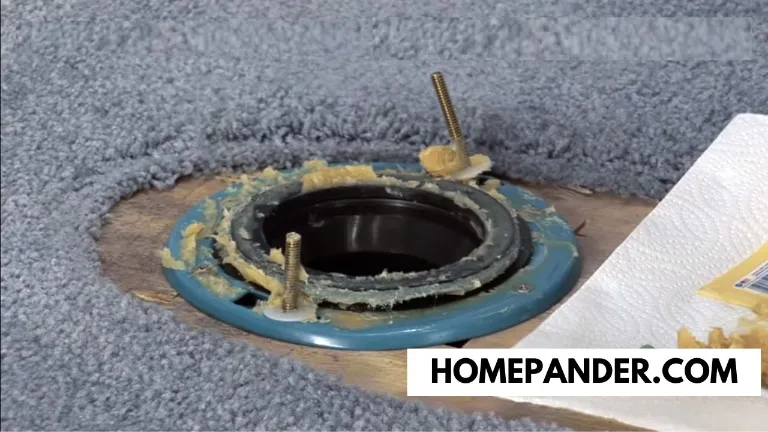
The wax ring is placed on the main drain line flange to snugly fit the toilet on the ground and prevent water leakage. If the ring is worn out for many years, the water will seep while passing the water from the toilet to the main sewage drain.
How To Determine It’s The Reason
A wax o-ring will last for 20-30 years and won’t need any maintenance during this time. But, sometimes prematurely, it may crumble and dry out. If the water still leaks after tightening the Tee bolts, then the damaged wax ring may be the reason for this.
How To Solve
There is no option instead of replacing the worn wax ring. Though the process requires some skills and time, you can do it.
The Things You’ll Need
- A disposable small plastic cup
- A sponge
- A flat screwdriver
- A vise grips
- An adjustable wrench
- Cardboard or a towel
- A trash bag
- A putty knife
- A new wax ring
Project Overview
- Estimated Cost- $10
- Required Time- 60 minutes
- Skill Level- Moderate
Process
- Shut off the primary water source on the toilet tank and disconnect the hose pipe from the toilet.
- Flush the toilet to drain the tank’s water. If there is any water in the tank and the toilet bowl, soak up the water with a small plastic cup and a sponge.
- Pry out the caps from the T bolts with the screwdriver.
- Remove the bolts from the toilet base with a vise grips and a wrench. Keep them in a safe place to get them quickly when you reattach them.
- Slightly shake the toilet to loosen it from the ground. Then pull the entire toilet with the tank and remove it. Keep it in a flat space on a towel.
- Remove the damaged wax ring and throw it in a trash bag. Next, pry away the remnants’ of wax seals with a putty knife from the toilet flange and the toilet base.
- Insert the new wax ring, ensuring it is placed in the center of the drain hole flange. If you want to use a silicone o-ring, mount it on the top of the ground flange.
- Place the T bolt into the flange by keeping its threads upward.
- Now carefully replace the toilet on the floor by ensuring your bolts go through the holes.
- Next, put some pressure on the toilet and waggle it to sit the toilet on the floor properly.
- Add washers and nuts into the bolts and tighten them with a wrench.
- Reconnect the water line hose pipe with the tank, and turn on the main water supply source.
- Fill up the tank with water and flush the toilet to check no water is leaking.
Best Tips To Maintain Your Toilet To Avoid Water Leaking
- Toilet leaking water is unsanitary, so you should wear safety gear (hand gloves, waterproof boots, and goggles) before fixing it.
- Always try to take short, cool showers and turn the exhaust fan on to dry the bathroom.
- If your toilet tank and bowl are integrated, it is a one-piece toilet. So there is no chance of leaking water from the toilet tank and bowl connection.
- Don’t use toilet tissue with additional layers, fragrances and lotions because they take more time to dissolve after flushing.
- Never flush any solid objects in the toilet instead of human waste and use 100% biodegradable toilet tissue paper.
- Don’t use any chemical toilet or drain cleaner to unclog your toilet if that is clogged. Instead, use home products or natural drain cleaners. Because these cleaners are formulated with chemicals that will damage your toilet pipes and other plumbing fixtures. So the water may leak from these places.
- Though your toilet functions properly, you should monitor every component every six months. So you can find out any issue earlier and take action accordingly. That means the problem won’t get worse.
Related Questions
[faq-schema id=”10545″]
Parting Words
So, now you know the reasons for a universal rundle toilet leaking. We have shown you how to determine the problem and its multiple solutions. Hopefully, you won’t face any challenges in finding out the exact cause of the leaking and solving it.
However, if it seems challenging or you aren’t confident to follow. We recommend you call a professional plumber. Though it costs you some bucks, you get the best results within a few minutes.


![How to Remove Crystallized Urine [Explained]](https://homepander.com/wp-content/uploads/2022/02/How-To-Remove-Crystallized-Urine.jpg)
![How To Clean Dark Grout That Has Turned White [5 Easy Ways]](https://homepander.com/wp-content/uploads/2021/12/How-To-Clean-Dark-Grout-That-Has-Turned-White.webp)